Since I started gardening in 2008 I have been starting seedlings on a folding table. The light unit was suspended on chains from the ceiling while supplies were stored under the table. It was a messy system that took up a lot of space in the sunroom, space that I would like to use later in the spring. I wanted a growing stand with movable shelves that would hold the seedling trays and associated supplies.

Next
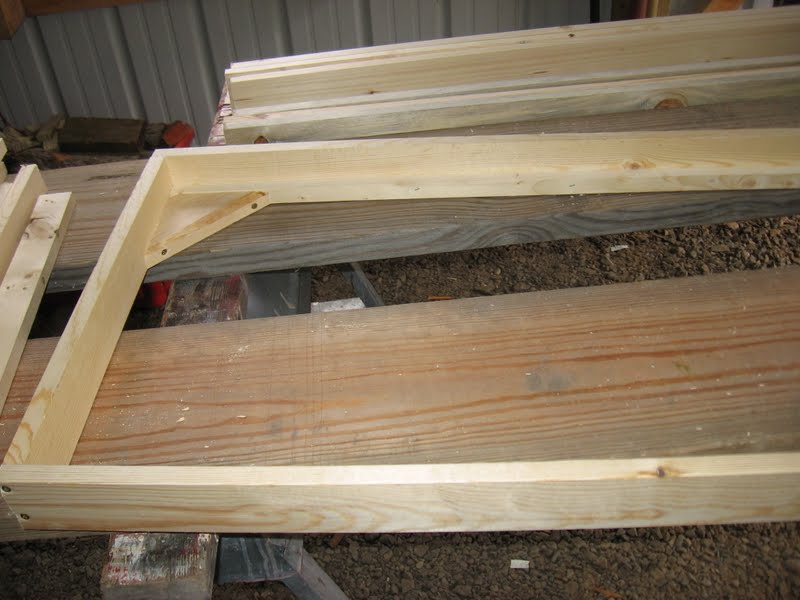
I built the shelves. For this I used
utility grade 1x4’s ($1.59 for a 6 foot piece).
To make the shelf frame I ripped the 1x4's to a 2 ¾ ” width. After screwing the frame together the ¾ inch
piece that was left over from the rip was fastened to the bottom of the
frame with small finish nails. Then I cut some triangles with 45
degree angles on the miter saw, squared the frame with a framing square, and
fastened the triangles to the back corners of the shelf. This not only makes the shelf square but also makes it rigid.

And here the shelf with
brace attached has been flipped over to the position it will go into the stand.
The cross pieces were
made by ripping 1 x 4’s into two equal width pieces about 1 ¾” thick. Once ripped they were cut to length (19
inches) on the miter box. I set up a
crude jig to make sure the pieces were exactly the same length (doing this also
saved a lot of time measuring).

The
crosspieces were set into the shelf frame on 3 inch centers, resting on the strip
of wood that had been tacked on when the shelf frame was built. I used an air driven trim nailer to fasten the
crosspieces, shooting two nails into the end of each crosspiece. The air gun is a real time saver. It would have taken several more hours
to nail these by hand.

The
last thing to do on the shelves was to fasten a crosspiece to the underside of
the shelves for hanging a light fixture.
These pieces were the scrap wood left over from ripping the groove on the 2 x4
legs. Waste not , want not!

With
all the components ready it was time to put it together. It took a little head scratching to figure
out a way to hold everything in place while a screw was set into each corner of
the shelves. If I had two more arms it would
have been a big help. You can see in
this picture how the grooves in the legs will keep the two movable shelves in
place.


You can see in this picture that it is braced in every dimension.


Here’s the finished product with the two trays of onions on the shelf, the light on and the paraphernalia on the bottom shelf. The clutter reducing factor is off the charts and it doesn’t look too bad either! As a bonus some of the onion seeds had germinated this morning. They must like their new home.

There's room to set four trays crossways on each of three shelves for a total of 12 trays (originally I thought it would hold 5 trays across but the trays are 11 inches wide and the shelf is 52 inches long). For tall plants that would be a little cramped given the height (62”) of this unit and the amount of space a flourescent fixture takes up. If one wants to grow plants like tomatoes on all three shelves the legs should be about 6 to 12 inches longer. For my purposes one growing shelf is all that’s needed since I never have more than three trays planted at a time. If I need the space the unit can be dismantled into the frame and shelves and stored.
Materials cost about
$40. The wood is construction grade
lumber. The 2x4’s are not spruce, maybe
fir, and they are much nicer and more solid than the usual spruce 2x4’s so I was lucky to get those. I could have used nicer lumber but it would cost a lot more. The front of the shelves could be dressed up
by tacking on some veneer or millwork to the front face. If I build another one I’ll make the
crosspieces for the shelves about 1 inch thick.
The 1 ¾ inch pieces are overkill and just add weight. And the top and bottom shelves will be
modified to make assembly easier. It’s a
straightforward project but you do need a good table saw to make accurate rips
in the legs.
2 comments:
Nice rack! I just started a few seeds this weekend and put them on seed starting shelves I made 25 years ago now. Mine are not as adjustable as yours, however, and that makes it a pain to keep the lights close to the plants - which really makes a difference. I like your design.
Regarding short shelf-life seeds, the freezer helps a lot. I save parsnip seed. To maintain good genetic diversity I like to mix older batches with the fresh seed so I don't have to grow out so many plants each year. (Best to have >35 plants for seed for out-breeders like parsnips.) So I always put the best seed, top seed crown from each plant, into the freezer and it germinates darn near as well as the fresh seed a year later. Onions are good for 2-3 years without freezing in my experience, and I bet those 2009 rutabagas still had >60% germination! Keep 'um cool and dry!
That is exactly the same as my seed starting shelving as far as dimensions and number of shelves - only mine was purchased and yours is made by your own hand which makes it even better. The price for yours is much better too! :D
Well done and I know you will get tremendous use out of it. I know I do with mine. Do yourself a favor though and go with the best lights you can afford. I find it makes a huge difference in the health of my seedlings to use stronger and broad spectrum lights.
Post a Comment