Since I started gardening in 2008 I have been starting seedlings
on a folding table.
The light
unit was suspended on chains from the ceiling while supplies were stored under
the table.
It was a messy system that
took up a lot of space in the sunroom, space that I would like to use later in the spring. I wanted a growing stand with movable shelves that would hold the seedling trays and associated supplies.
A shelf unit is pretty
basic. Once I came up with a design
strategy the biggest challenge was finding the right dimensions. I wanted a unit large enough to expand my
seed starting efforts if I ever took on a larger garden. It seemed that 4 shelves should be enough, with
all but the top shelf usable as a growing shelf. It should be over 4 feet long to accommodate a
fluorescent fixture of that size. It
should be at least 20 inches deep so the 10”x20” trays can be set across the shelves if needed. It should be tall enough that the bottom
three shelves can be used to start seedlings.
I estimated that each growing shelf needed at least 18 inches of space
above it to accommodate tall plants, and settled on a height for the unit of 62
inches, with the bottom shelf 8 inches above the floor. Once the dimensions were settled on
I began work.
I
started by ripping grooves in the 2 x 4 legs on the table saw. The groove is ¾” by 2”. I wanted the movable shelves to fit inside
the grooves and sit on pins inserted through the legs. That way the shelves could be moved by
pulling out the pins and putting them in a different place.
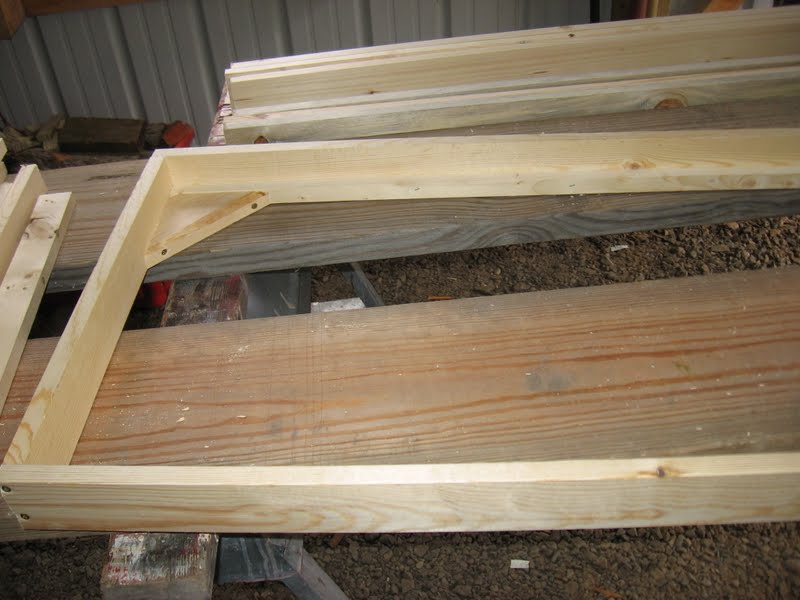
Next
I built the shelves. For this I used
utility grade 1x4’s ($1.59 for a 6 foot piece).
To make the shelf frame I ripped the 1x4's to a 2 ¾ ” width. After screwing the frame together the ¾ inch
piece that was left over from the rip was fastened to the bottom of the
frame with small finish nails. Then I cut some triangles with 45
degree angles on the miter saw, squared the frame with a framing square, and
fastened the triangles to the back corners of the shelf. This not only makes the shelf square but also makes it rigid.
And here the shelf with
brace attached has been flipped over to the position it will go into the stand.
The cross pieces were
made by ripping 1 x 4’s into two equal width pieces about 1 ¾” thick. Once ripped they were cut to length (19
inches) on the miter box. I set up a
crude jig to make sure the pieces were exactly the same length (doing this also
saved a lot of time measuring).
The
crosspieces were set into the shelf frame on 3 inch centers, resting on the strip
of wood that had been tacked on when the shelf frame was built. I used an air driven trim nailer to fasten the
crosspieces, shooting two nails into the end of each crosspiece. The air gun is a real time saver. It would have taken several more hours
to nail these by hand.
The
last thing to do on the shelves was to fasten a crosspiece to the underside of
the shelves for hanging a light fixture.
These pieces were the scrap wood left over from ripping the groove on the 2 x4
legs. Waste not , want not!
With
all the components ready it was time to put it together. It took a little head scratching to figure
out a way to hold everything in place while a screw was set into each corner of
the shelves. If I had two more arms it would
have been a big help. You can see in
this picture how the grooves in the legs will keep the two movable shelves in
place.
At
this point I carried the unit into the house to finish in the sunroom so I
could square and brace the stand on a level floor (and it was warmer
inside). From the
leftover shelf crosspieces I cut braces with 45 degree ends on the miter saw. The
corners of the rack were squared with a framing square then the braces were
attached with screws. It’s amazing how
even a short braces like these will turn a wobbly structure into a rigid
one.
You
can see in this picture that it is braced in every dimension.
Still
the front of the rack was a little wobbly so that was braced too. I chose to put the braces on the bottom shelf
where I thought they would be less of an obstruction. After finding out that they were a nuisance there I moved them to the top shelf. Sometimes it’s really hard to know what will work best in a design until you try it out.
Now
that the rack was rigid I turned to the middle shelves. Starting about a foot down from the top shelf
¼” holes were drilled every two inches. Bolts
were pushed through the holes where I wanted the shelf to be then the shelf was set on the botls. The legs had not been screwed tightly to the top
and bottom shelves so there would be enough slack to let the movable shelves
slide freely. I thought about making the
top and bottom shelves a little bigger to make sure there was room but having
two different sized shelves seemed like an extra complication.

After
the movable shelves were set in the unit the light fixture was attached. After mulling over different methods to
suspend the light I settled on the KISS method.
Eyebolts were fastened into the crosspiece beneath the top shelf shown in an earlier picture so they would be directly above the fixture hooks. A rope (from my old sailboat
no less) was tied to the hook in the fixture, passed through the eye bolt above it, out the end then wrapped
around a cleat. Yes I have to raise
and lower each end separately but sometimes I want to raise one end more than the other,
like when there are tall plants at just one end.
Here’s
the finished product with the two trays of onions on the shelf, the light on
and the paraphernalia on the bottom shelf.
The clutter reducing factor is off the charts and it doesn’t look too
bad either! As a bonus some of the onion seeds had germinated this morning. They must like their new home.
There's room to set four trays crossways on each of three shelves for a total of 12
trays (originally I thought it would hold 5 trays across but the trays are 11 inches wide and the shelf is 52 inches long).
For tall plants that
would be a little cramped given the height (62”) of this unit and the amount of space a flourescent fixture takes up.
If one wants to grow plants like tomatoes
on all three shelves the legs should be about 6 to 12 inches longer. For my purposes one growing shelf is all that’s needed
since I never have more than three trays planted at a time.
If I need the space the unit can be dismantled into the frame and shelves and stored.
Materials cost about
$40. The wood is construction grade
lumber. The 2x4’s are not spruce, maybe
fir, and they are much nicer and more solid than the usual spruce 2x4’s so I was lucky to get those. I could have used nicer lumber but it would cost a lot more. The front of the shelves could be dressed up
by tacking on some veneer or millwork to the front face. If I build another one I’ll make the
crosspieces for the shelves about 1 inch thick.
The 1 ¾ inch pieces are overkill and just add weight. And the top and bottom shelves will be
modified to make assembly easier. It’s a
straightforward project but you do need a good table saw to make accurate rips
in the legs.